Building a simple commenting form with Stimulus and Rails 6
07 Nov 2020If you use Ruby on Rails, you’ve probably heard of Stimulus, a “modest” JavaScript framework for sprinkling in small bits of JavaScript to your mostly-HTML front-end. Instead of reaching for the monster JavaScript frameworks that have become very popular in recent years, Stimulus gives you the tools to add just enough interactivity while relying on plain-old Rails and HTML as often as possible.
To show you the power and simplicity of Stimulus we’re going to build a simple Stimulus-powered implementation of a commenting form. When we’re finished we’ll have a comment form that skips a page turn and neatly renders our new comments as we create them, without jQuery or JS partials — just a little bit of Stimulus-flavored JavaScript and HTML. I’m going to walk through this step-by-step from a new Rails 6 project. If you want to follow along from an existing project that already has Stimulus and rails-ujs installed, skip ahead to the Creating our comment form section.
I’m writing this assuming that you’ve already got Rails installed on your machine and that you are generally familiar with Rails and Javascript. If you’re just getting started with either, you can still follow along, but you might find some things confusing!
I’m also not going to do a full overview of how Stimulus works, since the official docs do that well. Instead, our Stimulus work will be focused on integrating Stimulus with Rails.
Before we start, a note: Since this tutorial was written, Stimulus 2 has been released. The below code will all work just fine with Stimulus 2; however, you’ll get some deprecation warnings in your web console. The companion repository for this tutorial has been updated for Stimulus 2 if you’d like to see what has changed in Stimulus 2.
The Setup
First, let’s create our Rails project and setup our database, from our terminal:
rails new stimulus_comments_demo --webpack=stimulus
cd stimulus_comments_demo
rails db:create
The --webpack=stimulus here is the important part. This will ensure that our new project is set up correctly and save us a lot of copy/pasting boilerplate later.
Our demo application will have Projects and each Project will have any number of comments.
Let’s setup the basics of that structure next:
rails generate scaffold project name:string
rails generate model comment body:text project:references
rails db:migrate
Now that our project has resources, let’s update our routes.rb file to set a root path:
Rails.application.routes.draw do
  resources :projects
  root to: 'projects#index'
end
Finally, our Projects have many comments — let’s add that association to our project model
class Project < ApplicationRecord
  has_many :comments
end
Whew — the Rails setup work is out of the way and we now have a project ready for our new stimulus comment form.
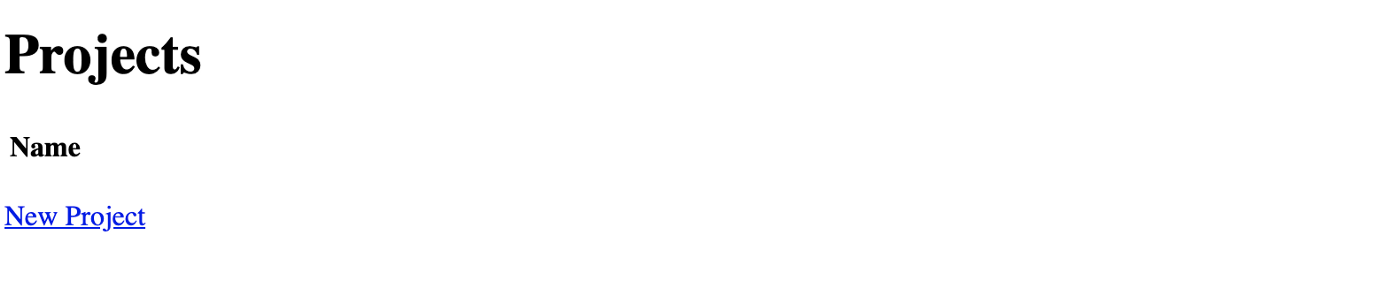
Verify everything is working by booting up your rails server and visiting localhost:3000 . You should see our unstyled projects page. Go ahead and add a new Project while you’re there since we’ll need that later.
Creating our comment form
With our Projects project setup, we can start building out comments. Let’s start by setting up our Rails controller for comments and adding views to support comments, from our terminal:
rails g controller Comments
touch app/views/comments/_show.html.erb
touch app/views/comments/_form.html.erb
Our Rails controller for comments will handle creation of new comments and, if you’ve ever handled a form POST in Rails, it will look pretty familiar.
class CommentsController < ApplicationController
  before_action :set_project

  def create
    comment = Comment.new(comment_params)
    comment.project = @project
    if comment.save
      # Instead of redirecting like we normally would, we render a partial for our Stimulus controller to handle

      # Note that we're just rendering HTML here, no need to render jbuilders or js partials

      render partial: 'show', locals: { comment: comment }, status: :ok
    else
      render partial: 'form', locals: { comment: comment }, status: :unprocessable_entity
    end
  end

  private

  def comment_params
    params.require(:comment).permit(:body)
  end

  def set_project
    @project = Project.find(params[:project_id])
  end
end
Before we move on to our views, let’s update our routes file so that our comments controller is accessible.
Rails.application.routes.draw do
  resources :projects do
    resources :comments, only: [:create]
  end
  root to: 'projects#index'
end
Next, we’ll add content to our comment view files, and update our project show view to render comments for the project.
<!-- app/views/projects/show.html.erb -->
<div class="comments" data-controller="comments">
  <div>
    <%= @project.name %>
  </div>
  <h2>Comments</h2>
  <div data-target="comments.commentList">
    <% @project.comments.each do |comment| %>
      <%= render partial: "comments/show", locals: { comment: comment } %>
    <% end %>
  </div>
  <div>
    <%= render partial: "comments/form" %>
  </div>
</div>

<!-- app/views/comments/_show.html.erb -->
<div>
  <%= comment.body %>
</div>

<!-- app/views/comments/_form.html.erb -->
<%= form_with model: Comment.new, url: project_comments_path(@project), data: { action: "ajax:success->comments#createSuccess" } do |form| %>
  <div>
    <%= form.text_field :body, data: { target: "comments.commentBody" }, placeholder: true %>
  </div>
  <div>
    <%= form.submit "Save" %>
  </div>
<% end %>
There are some important concepts in these views. Let’s walk through each one.
Our project show view connects to our Stimulus comments controller on line 2 with data-controller="comments" . The controller HTML element needs to wrap both our comment list and our comment form, otherwise the controller actions and targets on those elements won’t function.
Next, on line 7, we set our first Stimulus target with data-target="comments.commentList" . We’ll use this target in our Stimulus controller when we insert newly created comments into the DOM.
Finally, we connect our form to our Stimulus controller with data: { action: "ajax:success->comments#createSuccess on line 23.
This action listens for ajax:success events and calls the createSuccess method when an ajax:success event occurs. Remember that, by default, forms created with form_with are remote, which we want. Also note the data-target="comments.commentBody" on line 25, which we’ll use in our controller to clear the text field after submission.
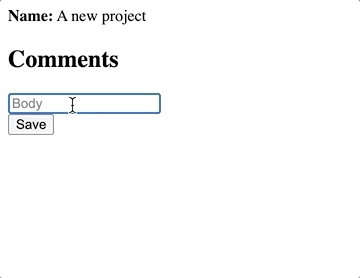
At this point, if we visit a project’s show page in our Rails app and submit our comment form the form submission will work just fine, you will just have to reload the page before you’ll see each new comment.
Adding the Stimulus Controller
Our Stimulus controller is the last piece we’re missing, and it is simpler than you might imagine.
Let’s start by creating our Stimulus controller:
touch app/javascript/controllers/comments_controller.js
And add in the code we need to process the HTML that Rails sends us each time a comment is successfully POSTed to the server:
import { Controller } from "stimulus"

export default class extends Controller {
  // Read more about targets in the Stimulus reference guide: https://stimulus.hotwired.dev/reference/targets

  static targets = ["commentList", "commentBody"]

  // The connect lifecycle method runs each time our controller is connected to the DOM

  // Read more about lifecycle methods in the Stimulus reference guide: https://stimulus.hotwired.dev/reference/lifecycle-callbacks

  connect() {
    console.log("We're connected!")
  }

  createSuccess(event) {
    // This might look a little magical but its just deconstructing the standard rails-ujs event detail

    // Read more here: https://guides.rubyonrails.org/working_with_javascript_in_rails.html#rails-ujs-event-handlers

    const [_data, _status, xhr] = event.detail

    this.commentListTarget.innerHTML = xhr.response + this.commentListTarget.innerHTML
    this.commentBodyTarget.value = ''
  }
}
That’s it — that’s the whole Stimulus controller and now we’re handling comment creation without a page turn, like this:
How does this all just work? The magic of Rails is doing a lot of heavy lifting behind the scenes so that we can listen for ajax events and respond to them in our Stimulus code.
Specifically, rails-ujs adds event handlers for us, making it easy to handle ajax events in our JavaScript code. With rails-ujs notifying us of ajax events, Stimulus kicks in through the data-action set on the form so that we can respond to the ajax event(s) we care about and run JavaScript to process the HTML generated by our Rails server. Mostly though, magic.
If all you were looking for is how to use rails-ujs and Stimulus to handle form POSTs in Rails, you’ve reached the end of the line. Read on for a bonus guide on Tailwind CSS setup and animating our comments.
Bonus: making things fancy with Tailwind CSS and animations
While adding commenting is nice, everything is more fun when it looks and feels nicer. Let’s add a little style to our project with Tailwind CSS and, for fun, look at one way to animate the entry of our comments into the DOM, instead of having them barge in unannounced.
Adding Tailwind to our project
Tailwind is a wonderful CSS framework that is rapidly gaining popularity in the web development world. While we could add styles without a framework, setting up Tailwind is worth the effort.
First, let’s install Tailwind and add it to our project, from our terminal:
yarn add tailwindcss
mkdir app/javascript/stylesheets
yarn tailwind init app/javascript/stylesheets/tailwind.js
touch app/javascript/stylesheets/application.scss
Next, in our application.scss file, we need to pull in Tailwind’s base styles:
@import "tailwindcss/base";
@import "tailwindcss/components";
@import "tailwindcss/utilities";
Finally, we need to tell webpack about our application.scss file by adding import "stylesheets/application" to app/javascripts/packs/application.js.
Since we haven’t seen it before, let’s look at the full application.js file:
// This file is automatically compiled by Webpack, along with any other files

// present in this directory. You're encouraged to place your actual application logic in

// a relevant structure within app/javascript and only use these pack files to reference

// that code so it'll be compiled.


require("@rails/ujs").start()
require("turbolinks").start()
require("@rails/activestorage").start()
require("channels")


// Uncomment to copy all static images under ../images to the output folder and reference

// them with the image_pack_tag helper in views (e.g <%= image_pack_tag 'rails.png' %>)

// or the `imagePath` JavaScript helper below.

//

// const images = require.context('../images', true)

// const imagePath = (name) => images(name, true)


import "controllers"

import "stylesheets/application"Everything in this file is boilerplate generated by Rails when we setup our project except for line 21, which we just added.
Almost there — now let’s update our postcss file to tell it about our Tailwind configuration file by adding require('tailwind.css')('app/javascript/stylesheets/tailwind.js') to postcss.config.js. Again, let’s take a look at this file in full to make sure we’ve got it setup correctly.
let environment = {
  plugins: [
    require('tailwindcss')('app/javascript/stylesheets/tailwind.js'),
    require('autoprefixer'),
    require('postcss-import'),
    require('postcss-flexbugs-fixes'),
    require('postcss-preset-env')({
      autoprefixer: {
        flexbox: 'no-2009'
      },
      stage: 3
    }),
  ]
}

module.exports = environment
Yours might be a little different — the Rails default is to update module.exports directly instead of assigning the configuration to a variable first. Either way, just add the content of line 3 to the plugins array and you’re all set.
Next, fire up your webpack-dev-server with bin/webpack-dev-server from your terminal so that changes get compiled as you work.
Okay — last step before we can start styling things. We need to update the application layout to tell it about the new stylesheet pack that webpack is creating for us by replacing the stylesheet_link_tag in the default layout with stylesheet_pack_tag.
Here’s what your application layout should look like:
<!DOCTYPE html>
<html>
  <head>
    <title>StimulusComments</title>
    <%= csrf_meta_tags %>
    <%= csp_meta_tag %>

    <%= stylesheet_pack_tag 'application', media: 'all', 'data-turbolinks-track': 'reload' %>
    <%= javascript_pack_tag 'application', 'data-turbolinks-track': 'reload' %>
  </head>

  <body>
    <%= yield %>
  </body>
</html>
Now we’re all set to use Tailwind to add a little style to our project. Tailwind’s documentation is exceptional so I’m not going to cover how Tailwind works. Instead, I’ll just add the markup I used, all of which is just standard Tailwind classes.
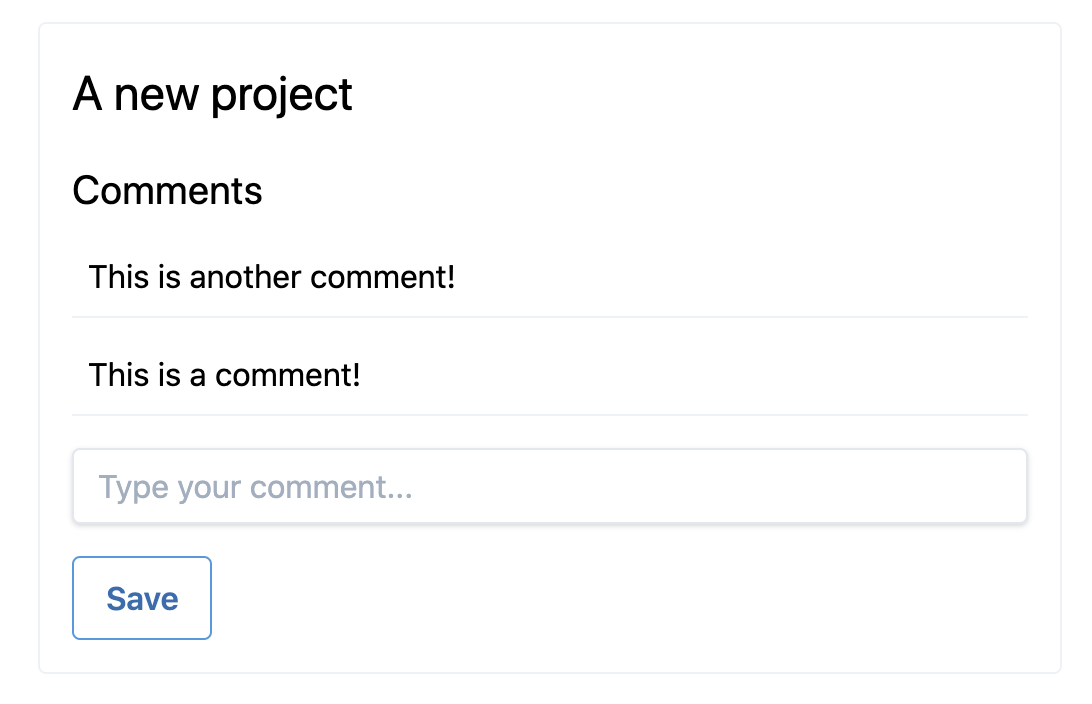
Here’s our styled Project show markup:
<div class="container mx-auto max-w-lg border border-gray-200 p-4 mt-4 rounded">
  <div>
    <h2 class="text-2xl mb-4"><%= @project.name %></h2>
  </div>
  <div data-controller="comments">
    <h3 class="text-xl mb-2">Comments</h3>
    <div data-target="comments.commentList" class="mb-4">
      <% @project.comments.order(created_at: :desc).each do |comment| %>
        <%= render partial: "comments/show", locals: { comment: comment } %>
      <% end %>
    </div>
    <div>
      <%= render partial: "comments/form" %>
    </div>
  </div>
</div>
And our comment show partial:
<div class="mb-2 border-b border-gray-200 p-2">
  <%= comment.body %>
</div>
And, finally, our form:
<%= form_with model: Comment.new, url: project_comments_path(@project), data: { action: "ajax:success->comments#createSuccess" } do |form| %>
  <div class="mb-4">
    <%= form.text_field :body, class: "shadow appearance-none border rounded w-full py-2 px-3 text-gray-700 leading-tight focus:outline-none focus:shadow-outline", data: { target: "comments.commentBody" }, placeholder: "Type your comment..." %>
  </div>
  <div>
    <%= form.submit "Save", class: "bg-transparent hover:bg-blue-500 text-blue-700 font-semibold hover:text-white py-2 px-4 border border-blue-500 hover:border-transparent rounded cursor-pointer" %>
  </div>
    <% end %>
All put together, we get a Project show page that looks like this:
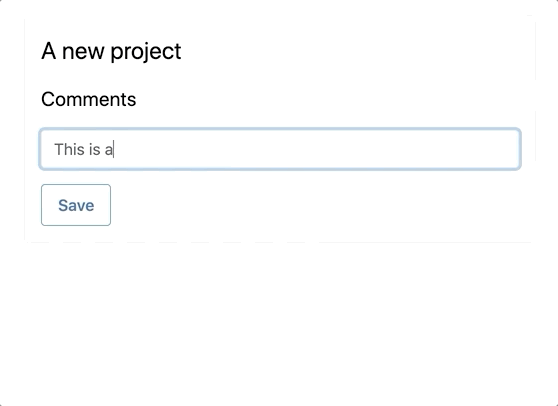
Animating comment creation
While our comments get added to the DOM right away, they appear instantly, which can feel a little jarring. Let’s wrap up by animating the entry of each new comment into the DOM by first making some small updates to the createSuccess method in our comments_controller.js file.
createSuccess(event) {
  const [data, status, xhr] = event.detail
  const target = event.target

  // Create a wrapper div to hold our newly created comment

  const newComment = document.createElement("div")

  // Add our animation class to the wrapper div and set the innerHTML to the comment rendered by the server

  newComment.classList.add("fade-in-left")
  newComment.innerHTML = xhr.response

  // Add our wrapped comment to the beginning of the comment list

  this.commentListTarget.prepend(newComment)
  this.commentBodyTarget.value = ''

  // After the animation finishes (in 0.6 seconds), remove our animation class

  // If we don't remove the animation class, adding another comment will cause every comment added since our initial page load to animate together

  setTimeout(() => {
    newComment.classList.remove("fade-in-left")
  }, 600);
}
Our fade-in-left class isn’t functional yet because we haven’t added any CSS to it. We’ll add that next, with some help from animista.net so we don’t have to write our own animation.
Let’s add the following to our application.scss file, so we don’t need to create a new file as we near the end of our time together:
.fade-in-left {
  -webkit-animation: fade-in-left 0.6s cubic-bezier(0.390, 0.575, 0.565, 1.000) both;
          animation: fade-in-left 0.6s cubic-bezier(0.390, 0.575, 0.565, 1.000) both;
  }

  /* ----------------------------------------------
  * Generated by Animista on 2020-10-15 23:32:49
  * Licensed under FreeBSD License.
  * See http://animista.net/license for more info.
  * w: http://animista.net, t: @cssanimista
  * ---------------------------------------------- */

  /**
  * ----------------------------------------
  * animation fade-in-left
  * ----------------------------------------
  */
  @-webkit-keyframes fade-in-left {
          0% {
            -webkit-transform: translateX(-50px);
                    transform: translateX(-50px);
            opacity: 0;
          }
          100% {
            -webkit-transform: translateX(0);
                    transform: translateX(0);
            opacity: 1;
          }
        }
        @keyframes fade-in-left {
          0% {
            -webkit-transform: translateX(-50px);
                    transform: translateX(-50px);
            opacity: 0;
          }
          100% {
            -webkit-transform: translateX(0);
                    transform: translateX(0);
            opacity: 1;
          }
        }
With those changes in place, each newly added comment now politely animates into the DOM:
Wrapping up
Together, we looked at how you can use the power of rails-ujs and Stimulus to add a little bit of interactivity to your Rails apps without needing to rely on bulky front-end frameworks or clunky JS partials and jQuery solutions. Stimulus + Rails can deliver simple, clean, and interactive experiences for your users, while retaining all of the joys that come with building standard Rails apps.
Here’s a preview of what you can build with just a little bit more Stimulus than what we worked on today— all of the interaction you see in the gif below is built with Stimulus + rails-ujs:

Thanks for reading!
Additional Resources:
- The full code for this repository can be found on Github .
- The Stimulus official docs
- Working with JavaScript in Rails
- BetterStimulus.com for various Stimulus patterns and best practices